

I see a lot of women carrying DSLRs. When I first published this article in Fall of 2018 I found that the camera and camera bag industries were still very heavily catered towards men. That means a lot of masculine-looking, large, heavy bags and carrying cases. I’ve seen a lot of improvement over the last 4 years and there are bags for women as well as gender neutral bags.
This Article Is For Hobbyist Photographers not Professionals
I am a hobbyist photographer. I mostly use my DSLR for travel. This article is for other hobbyists.
Non-leather Products
I try my best to avoid leather products. Thus the items I recommend throughout the article have no or minimal leather. Sometimes, despite my best efforts, it’s difficult to know if a trim or small part is leather.
To provide some context, I travel internationally approximately 3 times a year and domestically many times throughout the year. I take my DSLR with me about 90% of the time. I have and continuously spend a lot of time researching and figuring out the most comfortable, cute, effective and affordable ways to travel with my DSLR, as a hobbyist.
For your reference I have a Canon T6S and I usually carry 1-3 lenses with me when I travel: my ‘nifty’ fifty, a zoom lens, and a wide angle lens. Sometimes I rent lenses too, but I never carry more than 3 lenses on a trip. I’m 4’11” and thin. So ladies, I hope this info is useful and relatable for you. 🙂
My DSLR Carrying Gear
I have whittled my camera carrying gear to a few items:
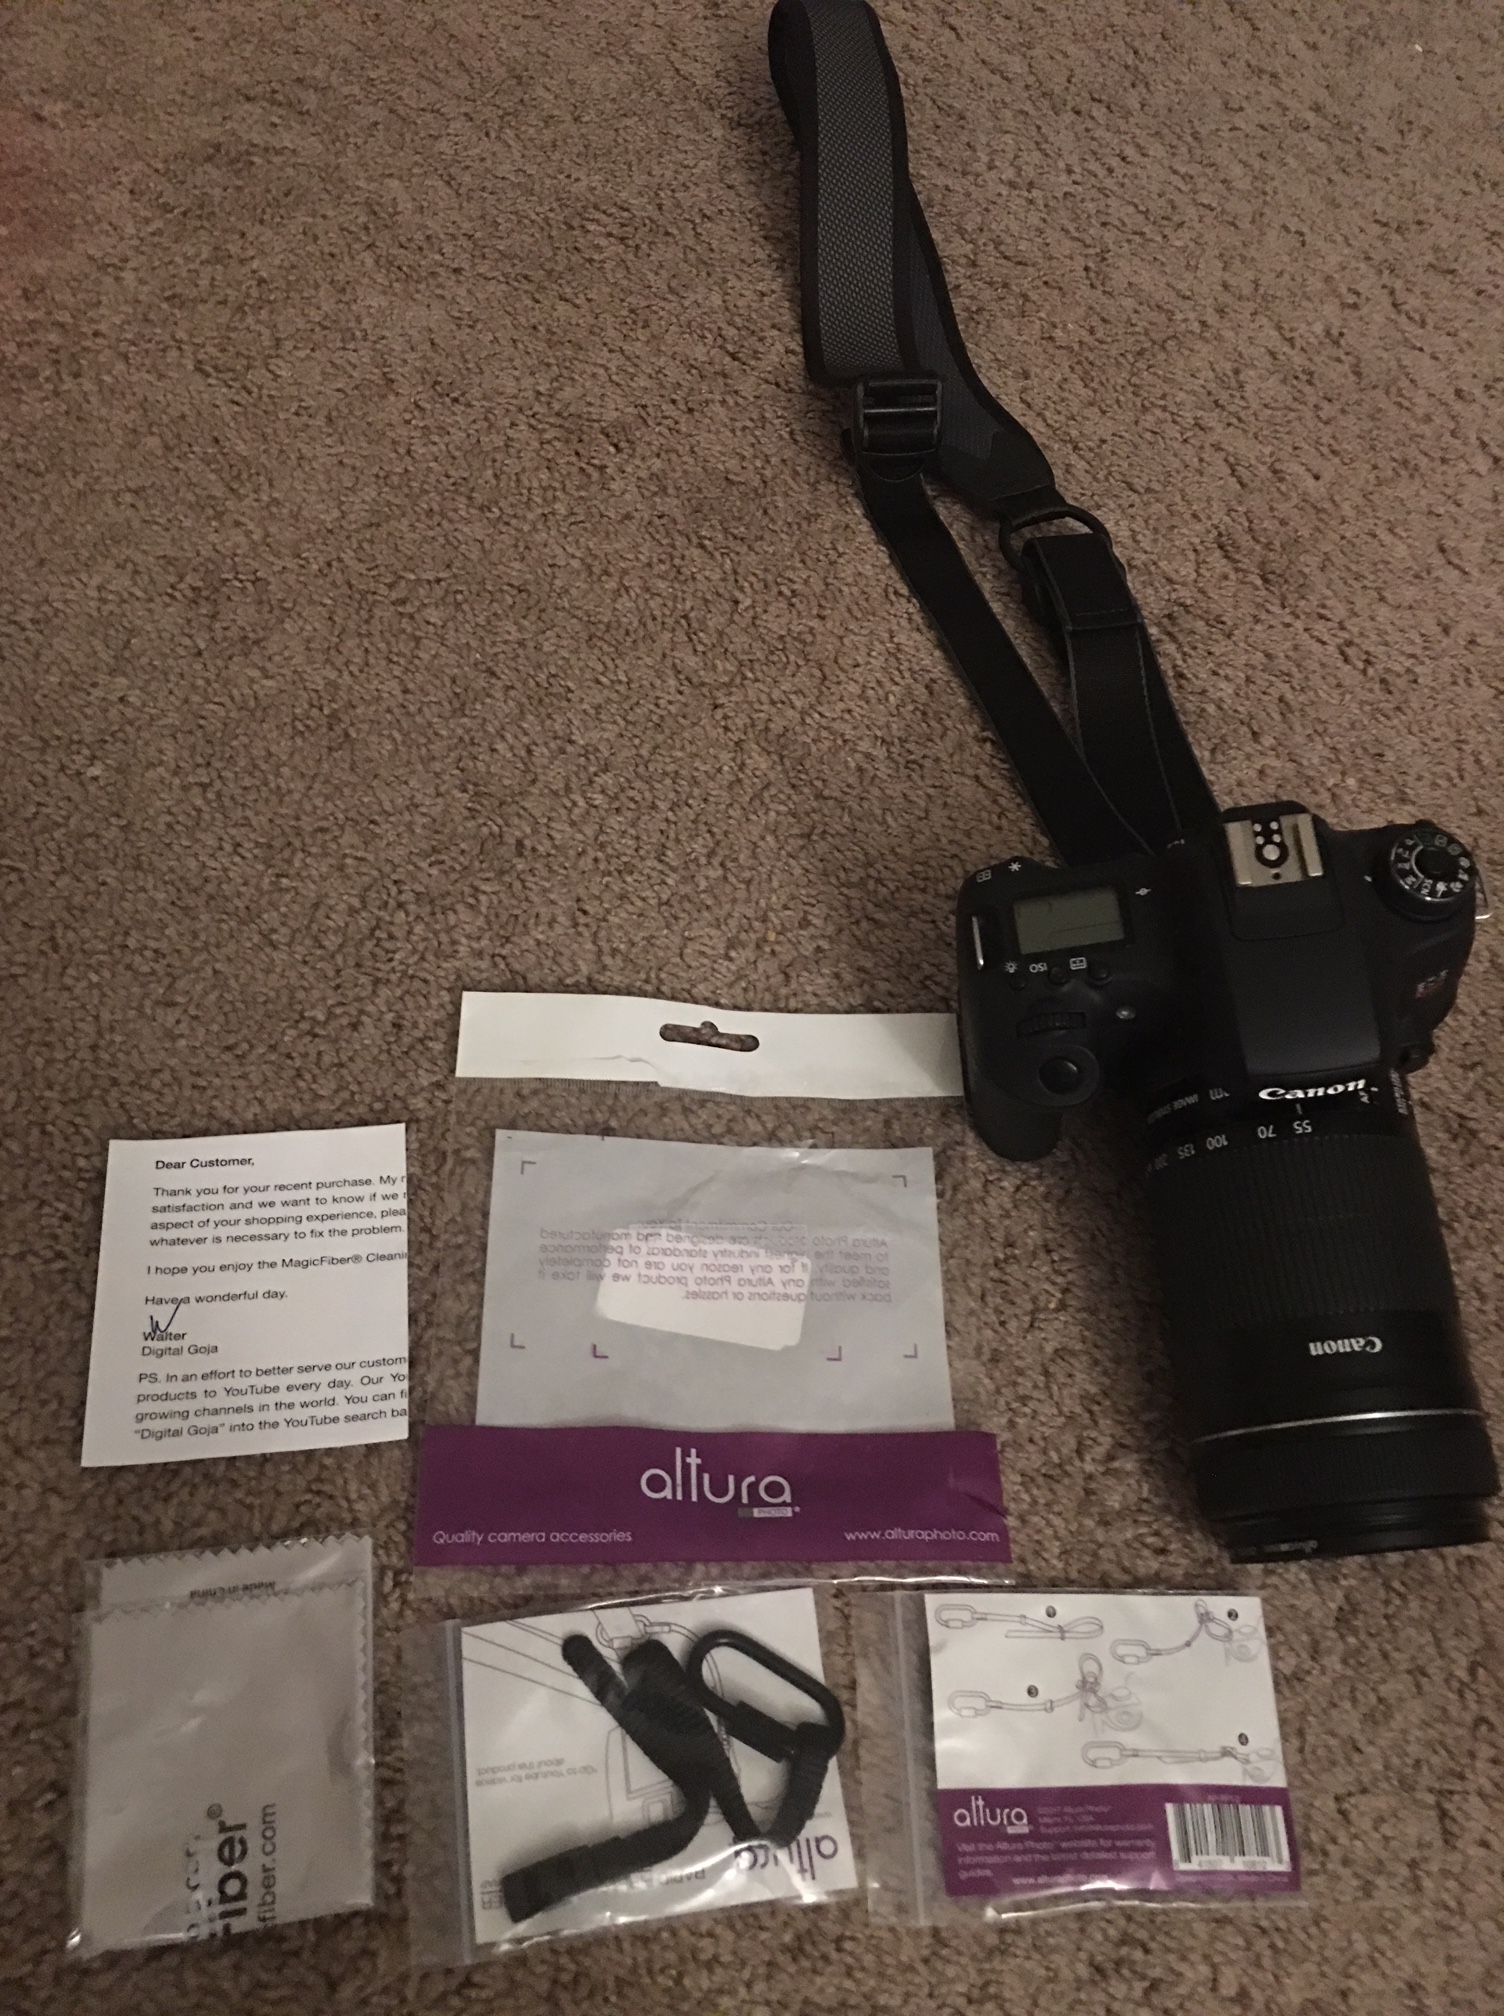
- a camera strap. I don’t like the one that Canon included. I bought the Joby Women’s specific D-ring strap. And I think I got really lucky because the following week it was no longer available…anywhere. I concluded that it must have been discontinued. I bought it for around $40USD. I looked into other straps such as Black Rapid and a few others. Later in the article I compare 3 camera straps and why I chose this one.
UPDATE 2022: the Joby sling has several signs of wear and tear (4 years later but 2 of which the camera wasn’t used much). The D-ring doesn’t really work anymore and that was one of my favorite features of this sling. I bought the Peak Design Slide Lite strap. It has the same slide and lock mechanism as the Joby strap without the D-ring. It has excellent reviews online and in one of their promotional videos, they showed a little girl using it which was reassuring as a petite woman.
I took it to Vietnam and it worked great!
Other gear:
Update 2022 New Gear: Peak Design Capture Clip – so I can hike with the camera better. This really is a game changer. I was comfortable and had quick access to my camera.
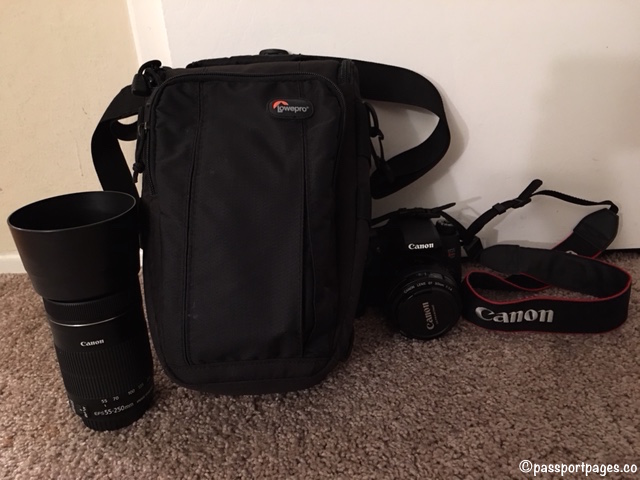
- a crossbody toploader camera case ($40) Update 2022: I haven’t traveled with this LowePro bag in more than 4 years and don’t plan to.
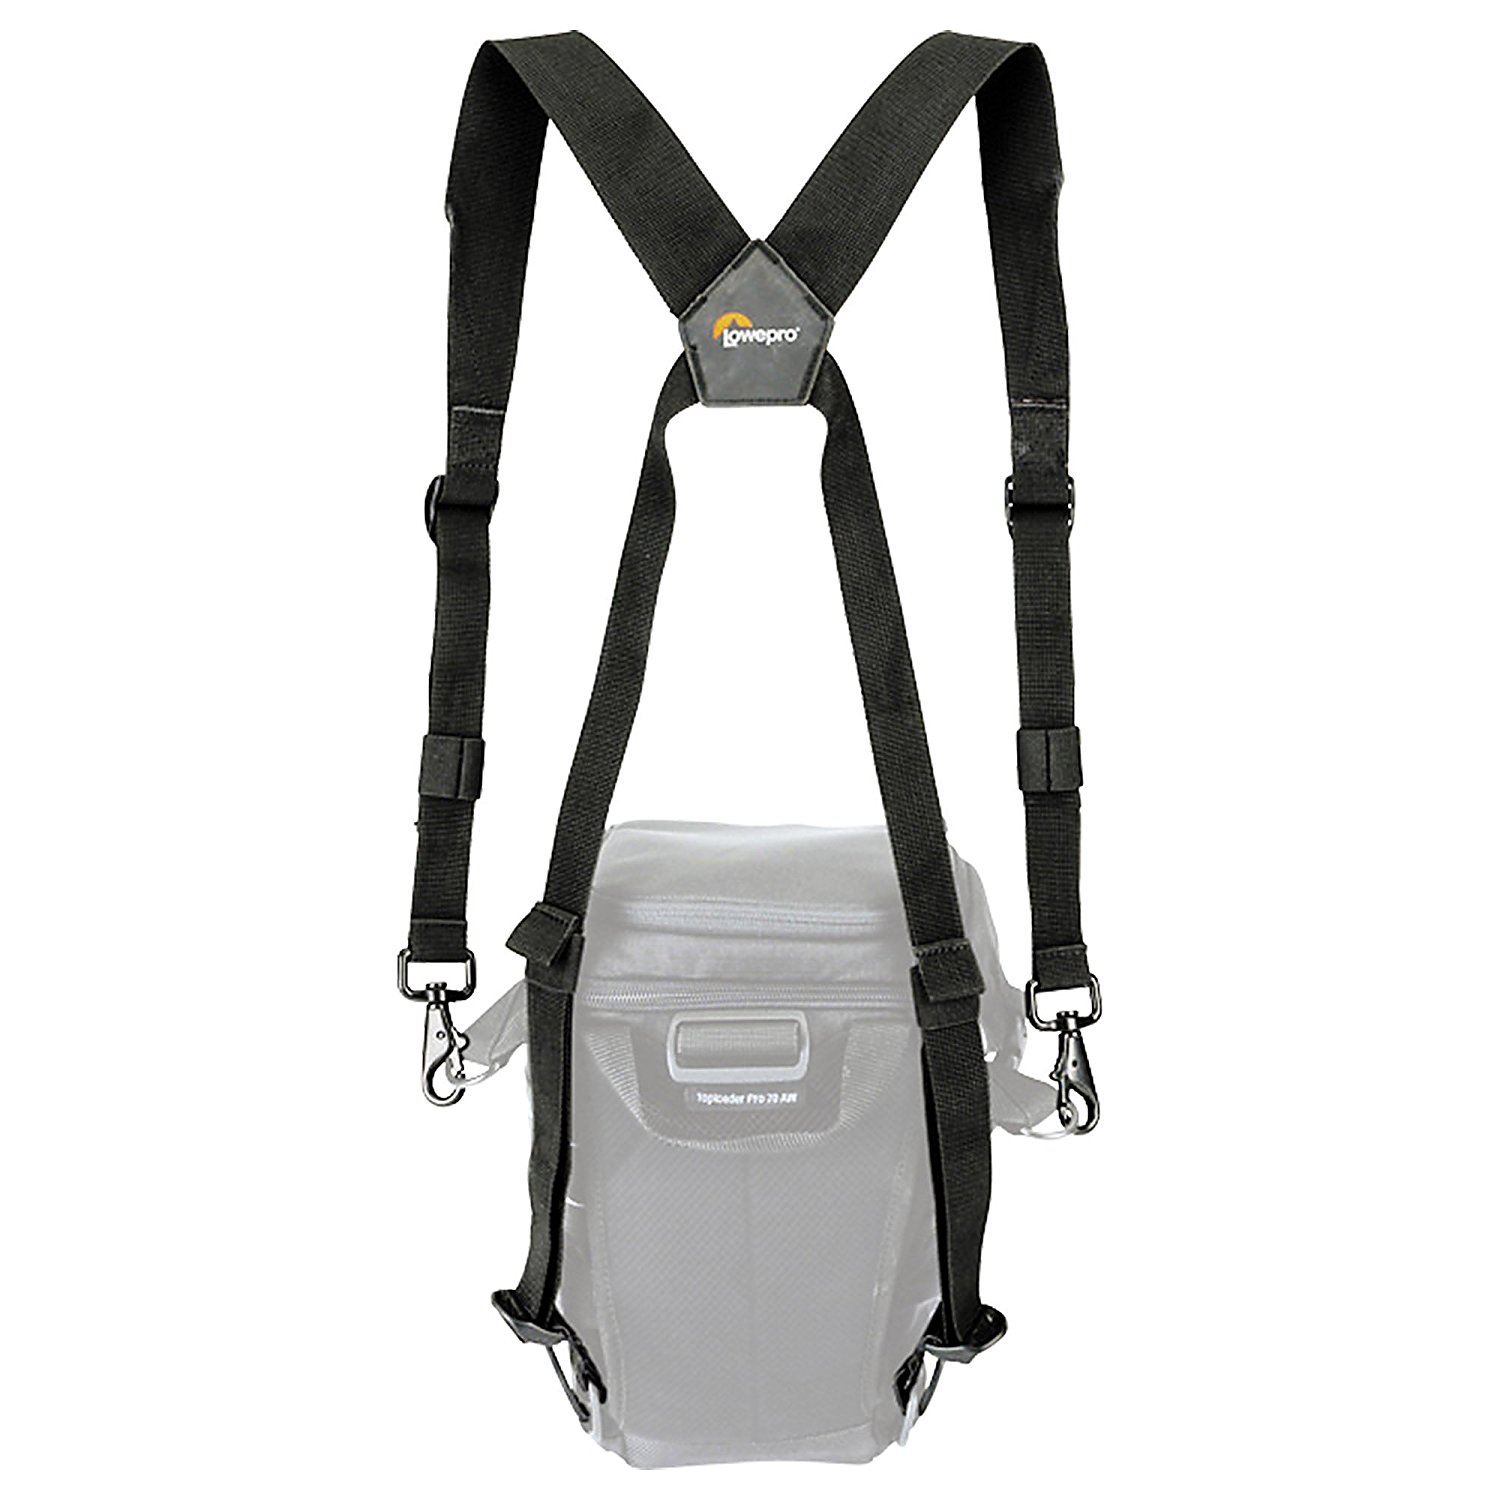
- a chest harness ($17) – This attached to the LowePro Toploader. UPDATE 2022: Nope, I haven’t used this since my 2017 trip to Costa Rica and don’t see myself using this…ever.
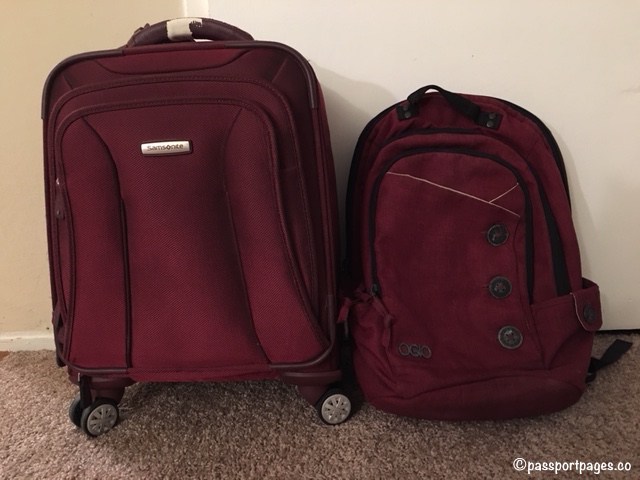
- Non-camera specific Ogio Women’s Soho backpack ($60-$80) UPDATE 2022: After more than a decade around the globe, through grad school and domestic travel, I retired the Ogio and instead of replacing it with a new one, bought a different brand and below share why, even though I still like Ogio.
- lens pouches ($14) – still have ’em and use ’em.
- strap tether ($5) – UPDATE 2022: switching to Peak Design’s anchors.
- shoulder bag ($150) – UPDATE 2022: switched to slings
- dry bag ($10) – still have and use
Prices listed above are approximations of what I paid, but prices can vary.
All Your DSLR Carrying Gear For About $310-$500
So for about $500 I’ve got all the carrying gear that I need for a variety of scenarios. I have all of this gear but I don’t take all of it with me on all of my trips. Every trip is different. I take gear based on where I’m going and the conditions and circumstances I’m photographing. In this article I’ll break down what gear I use in different scenarios.
Specialty Camera Bags vs. Traditional Backpacks
I find that most specialized camera bags are nice but they’re really made for men. Why? Because most can’t double as a handbag or a daypack with the carrying capacity that women need.
When I travel, my camera bag doubles as my carry on as well as my daypack. So I need it to have space for my laptop, snacks, toiletries/makeup and other travel essentials. Most, specialty camera bags, do not accommodate those needs. They’re really great for what they’re meant to do — carrying your camera gear — but personally I found most of them impractical for the modern traveler hobbyist -photographer, woman.
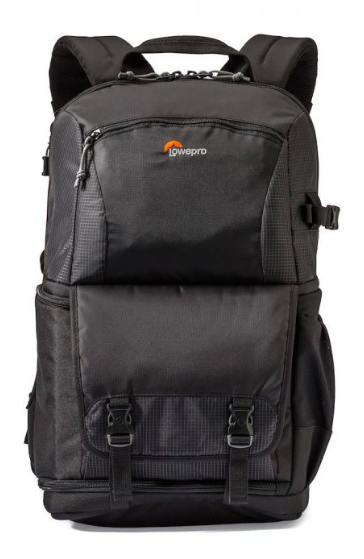
Lowepro DSLR Backpack
The one specialty camera bag I do like is this one from Lowepro. You can fit a 15″ laptop along with other non-camera items but looks-wise this has “man” written all over it. The last time I checked this backpack was out of stock, but Lowepro makes several camera backpacks with this general overall look. Their backpacks range from approximately $130 to approximately $400.
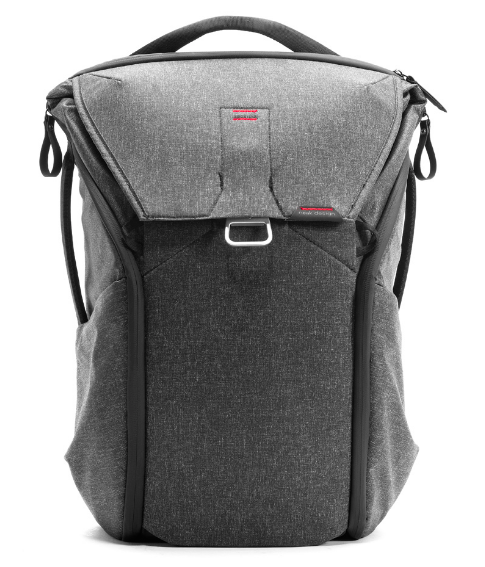
Peak Design DSLR Backpack
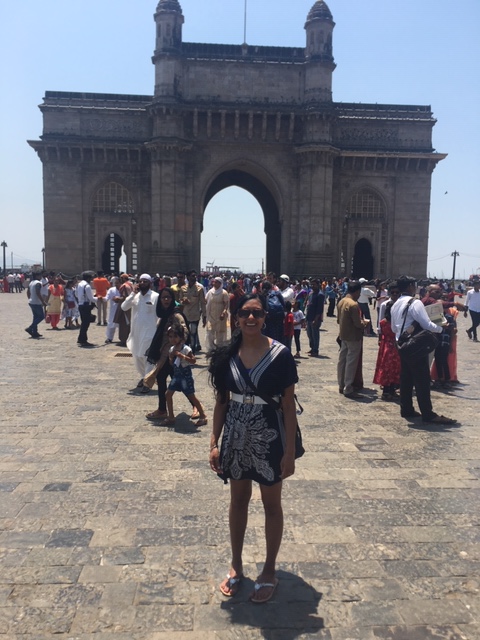
Update: I recently discovered Peak Design. And I have to say I really really like their Everyday Backpack; $259.95 for 20L and $289.95 for 30L. My husband got the 20L and I used it as my carry-on as well as a daypack on a recent trip to Mumbai, India and I was so comfortable carrying it with my DSLR, my 13″ Mac laptop, snacks, and other lady travel essentials.
Comfortable + Carrying Capacity: The weight distribution in this bag is fantastic and I love that it has the ability to add/remove gear while you’re wearing the bag. The padded camera divider-inserts are removable so I could reconfigure the entire bag to whatever I needed. That flexibility is fantastic so you can adjust and reconfigure the bag whether you’re trekking, shopping or leisurely roaming about a city.
Aesthetics: I like that this bag looks like something anyone would want to carry – sleek, nice color and trim. Though I will say I’ve only seen men carrying them – seem to be more popular amongst men.
Other Features. There are lots of other cool features of this bag – too many to mention here but click this link to learn more. Bonus points that a woman is doing the explainer video and actually packs the bag with her gear.
I would hesitate to take this bag to the beach or if I did, not without having a cover for it. The cover would not only protect your gear but also this luxury bag. I don’t think Peak Design sells covers but you can buy a generic one on Amazon starting at around $7.
{My Favorite:‘Regular’ Backpacks Are Great For
Carrying DSLRs!}
If you don’t want to invest a couple hundred for a DSLR backpack I recommend ‘regular’ backpacks – like the ones we used to carry to school – are the best!
There are loads of backpacks out there so look for something sturdy that will accommodate everything you need. Think through the various things you need/want to carry on the journey to your destination as well as day trips at your destination, such as: water bottle, rain jacket, snacks, money/wallet, lip balm, compact, extra camera battery and memory cards etc.
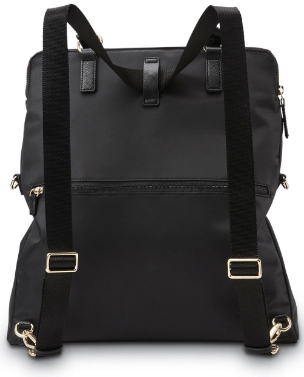
In particular, I’m a big big fan of Ogio’s Soho Women’s Laptop Backpack. I’ve had mine for 11 years and taken it on pretty much all of my travels – domestic and international ranging from beach holidays and serious hikes and treks such as Corcovado National Park in Costa Rica and gorilla trekking in Uganda to leisurely hikes at Point Reyes in California, as well as traipsed around London, Cape Town and other cities with this backpack on.
The Ogio Soho backpack is sturdy and fits everything I need during long haul flights, day trips, hiking or trekking. And it’s made for women – feminine and attractive looking and has lots of dedicated pockets. I love the thoughtful design with not only a computer slot but a pocket for your computer charger, also pen slots, lipstick/lip gloss slots, a zippered pocket and more. You’ll see in this explainer video.
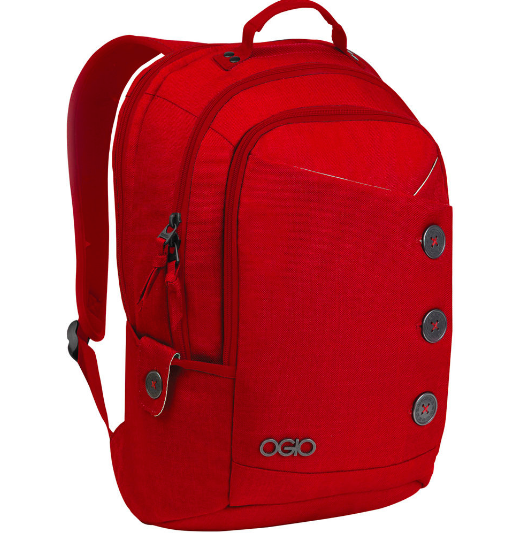
Ogio Soho Women’s Backpack, $79.99
Update 2022: I recently switched to Swiss Gear backpacks. My tried and trusted Ogio Soho has major signs of wear. It’s still sturdy except for the water bottle pockets. They’re shallow from the get-go and loosen over time, making them useless. On a recent trip my water bottle fell out of the loose pocket and I didn’t even notice.
I considered purchasing a new Ogio Soho but was surprised that more then a decade later they haven’t updated the design at all. Still no key holder, still the same shallow water bottle pockets. Still no padded laptop sleeve. It’s interesting because their men’s backpacks are awesome. They have everything I’m looking for. But they look super masculine.
So I decided to look around. I couldn’t find anything from Osprey nor Gregory. I looked at Mystery Ranch too.
Then I remembered being in NYC recently and walking behind a woman and admiring her backpack. I wrote down the brand and so glad I did as I found my new Swiss Gear pack on Amazon for only about $10 more than the Ogio Soho. Plus it’s Amazon so shipping and returns are easy.
The Swiss Gear pack has all the features I am looking for:
- more padding on straps compared to Ogio
- deep mesh water bottle pockets with a strap to secure it
- lots and lots of pockets
- padded laptop pocket with easy sude slide out access
- carabiner and attachment loops
- key ring – that could have been more user-friendly. Instead of a ring – a hook
- fits underneath seat in front of you on plane
- strap hook for sunglasses
- Peak Design Capture Clip easily attaches to both
But it is heavier than the Ogio Soho.
{How To Use the Ogio Soho and Swiss Gear For Carrying Your DSLR}
I wrap the camera body (without lens attached) in a heavy scarf and place it in the middle zippered section of the backpack. For the lenses I place them in these pouches with the camera body. That’s what I do on the plane journey to the destination.
Once I arrive at my destination, I keep the camera in that same middle section with the lens attached (so that when I take it out, I can just use it, rather than assembling) and if I’m carrying an additional lens, it’s in one of these pouches.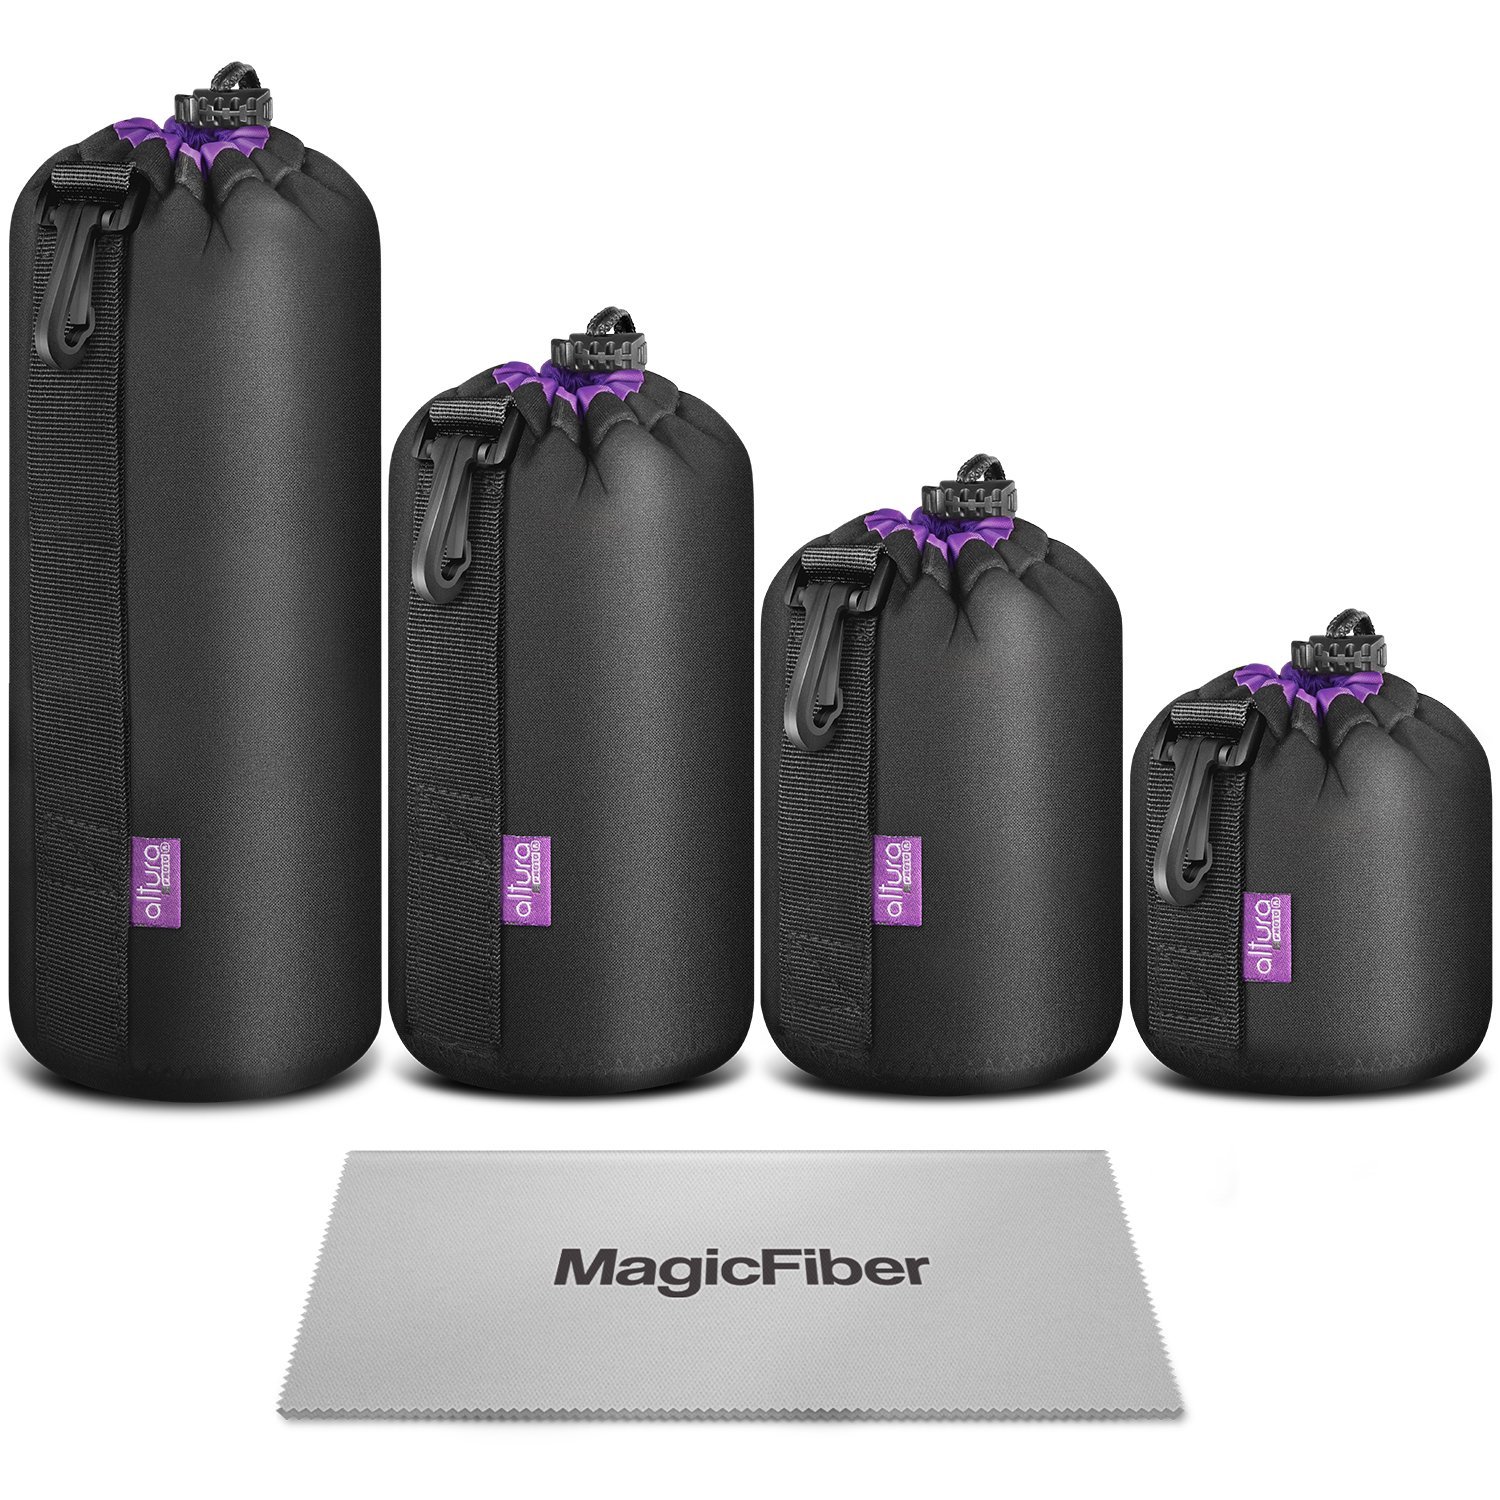
There are two minor things that I don’t like about these backpacks:
- not water resistant
- don’t come with a rain cover. I bought a generic cover on Amazon and it’s been great.
{Bags for City Travel vs. Adventure Travel}
Backpacks are great for adventure travel like hiking and trekking and even traipsing around a city but sometimes you don’t want to carry a backpack. For example if you and your girlfriends are doing a spa weekend and you want something that’s more chic. There are stylish, purse looking backpacks but I find they’re usually too small to carry a DSLR.
I have found a few non-leather options. I haven’t bought any of these bags because they’re all big bags – too big for my small frame. But at least now we’re getting somewhere in terms of style and function for women.
Update December 2022: I still stand by what I wrote about the products below – 3-4 years later. I also want to add a product, sling bags.
If you are right handed then the options abound for you. If you are a leftie then you’ll probably want a bag that has the option to be worn on either shoulder. There are a lot less of those.
I wish I could have gotten the Patagonia Atom sling – but it’s not leftie friendly.
But the Osprey Daylite sling is. Don’t let this little bag fool you. It’s got some serious capacity for a small DSLR and a small lens.
Sherpani makes some slings that are bigger, leftie-friendly and have anti-theft features. But again, a small DSLR with one small lens will fit.
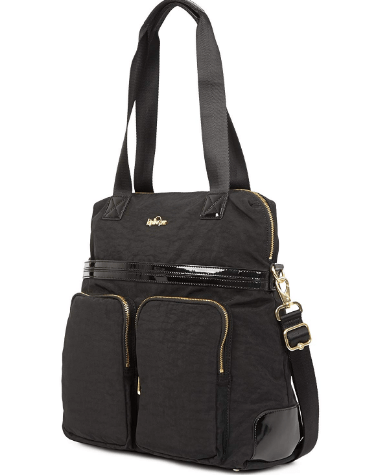
I bought the Kipling Camryn Satchel and while it’s a little too big for me, I like this bag for short weekend trips. I love that it is made of malleable material, so I was able to pack it in my checked luggage. For days that I was working in the cafe, at the resort or a day out shopping, I had a non-sporty bag.
The Kipling Camryn Satchel. $149-$159, available at major retailers and Amazon.com. It’s described as a laptop bag because it has a laptop sleeve. But you can also fit your DSLR in the deep main pocket. I have to be honest while traveling for a weekend trip carrying this with my laptop AND my DSLR and lenses inside, this bag was uncomfortably heavy. Thankfully it has a luggage sleeve so that I didn’t have to carry it (as long as I was traveling with a roller bag). And once I arrived at my destination I off loaded the weight and carried some combo – but never all of my gear simultaneously.
Bottom line for me – if I’m gonna be out and all day, and either carrying my DSLR + computer or just my DSLR, I prefer a backpack. Carrying this bag around all day – would be uncomfortable.
The Kipling Camryn Satchel can be worn as a shoulder bag or crossbody. I tried this on at Macy’s and loved a few things:
- the good looking gold hardware
- the sleek belt across the front
- lots of pockets
- the outside back packet that doubles as a luggage tow sleeve or triples as place to hang a jacket.
- can fit a large or small laptop + DSLR + lenses + all other travel necessities, all at the same time
- bonus points for being non-leather/animal products
- super versatile – great while in transit, chic for carrying around a city
- adjustable cross-body strap for hands free carrying
The things I don’t like so much:
- Unfortunately the shoulder straps are non-adjustable (not good for petites). Only the crossbody strap is adjustable.
- For women who are 5’0″ and under, this is a big bag. I read reviews of women who were that short or even a few inches shorter who loved it. Overall I’m glad I bought this.
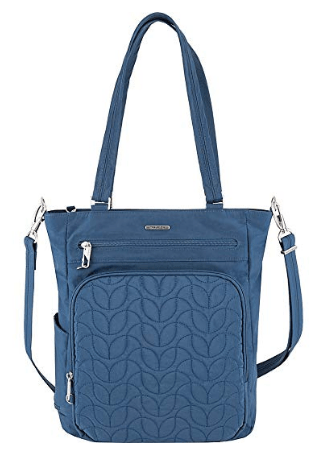
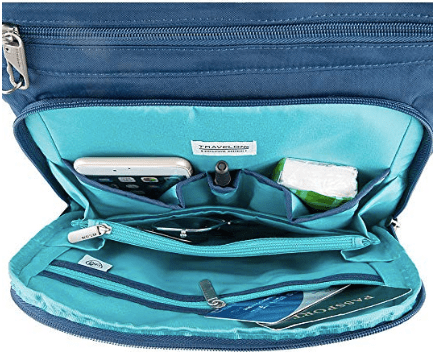
Travelon Quilted Anti-theft Tote $80 on Amazon and comes in a few different colors.
This bag can fit a 15″ laptop in addition to your camera, and all of your other travel necessities. It also has a collapsable exterior water bottle pocket. I like that. It’s nice to not have that pocket sticking out when it’s not in use. The quilted design is nice too, though I’m partial to the crinkled nylon on the Kipling. This bag has all of the classic Travelon features such as slash proof front, straps, the reinforced hardware clips and RFID blocking technology (which I’m not convinced is a big benefit).
Like the Kipling Camryn bag, the shoulder straps are non-adjustable and can also be worn crossbody. However unlike the Kipling, the outside back pocket does not double as a luggage sleeve.
It’s a really big bag. I think for taller women this is great but for petites it might be overwhelming.
The third option I have found is the Samsonite Encompass Womens Convertible Backpack. $240 full price, though it often goes on sale. This bag combines features from the Kipling and Travelon bags – gold hardware, RFID blocking technology built-in, a luggage strap. But some additional nice features are that this bag can be worn as a backpack in addition to shoulder, tote, and crossbody. And recognizing that it’s a long bag, they made it so that the upper portion is foldable. See the video in the photo carousel and the photo below.
I also like the front exterior water bottle pocket, instead of being on either side of the bag, giving it a more sophisticated look.
It’s a big bag and the collapsible feature definitely makes it more petite-friendly. The challenge is you can’t go to a store and try it out before buying. They have a virtual try-on on the website and based on that I concluded that this bag is also too big for me.

{Shoulder or Crossbody DSLR Bag}
I like my Lowepro crossbody bag. (I bought it on Amazon ~$40). This bag is compact, comfortable and fits my camera body with a zoom lens attached, plus my nifty fifty lens, along with extra memory cards, cleaning wipes and even a small wallet, hotel key, my lip balm, and tissues. The main drawback of this bag is that it screams, “camera bag!” and the strap can get a bit uncomfortable as it’s not padded. I travel with this bag when I want quick access to my camera without having to stop and reach into my backpack to get it. I’ll also use this for rain forest and trekking hikes as it comes with a rain cover.

{Chest Harnesses and Camera Straps}
I also bought the chest harness ($17 on Amazon) that can be attached to the Lowepro cross body bag.
This is for maximizing comfort and handsfree carrying, while also maintaining quick access to the camera and protecting it from the elements. The harness attaches to the Lowepro crossbody bag.
But let’s be real, this is very unattractive and VERY dorky looking. I travel pretty often and I’ve never seen another person in all of my global travels – man nor woman – donning one of these. So you have to be all in and not care what you look like to wear this. I wore this throughout Costa Rica and I was VERY comfortable. But I have to be honest, I regret many of the photos that I’m in because I’ve got this huge bulky thing on.

A month ago, I found this Joby camera strap. I took it with me to go gorilla and chimp trekking in Uganda and this strap is my official chest harness replacement. The Joby strap is perfect for women (even very short women). I was trekking through extremely thick foliage in Bwindi Impenetrable Forest and Kibale National Park and I had the super quick access to the camera that I absolutely needed. And it was very comfortable and locks the camera into place on your person.
The camera is not protected from the elements but even in those rugged trekking conditions it was fine. I had a rain cover in my pocket that I could whip out at a moments notice as it’s not called a tropical rain forest for nothing!

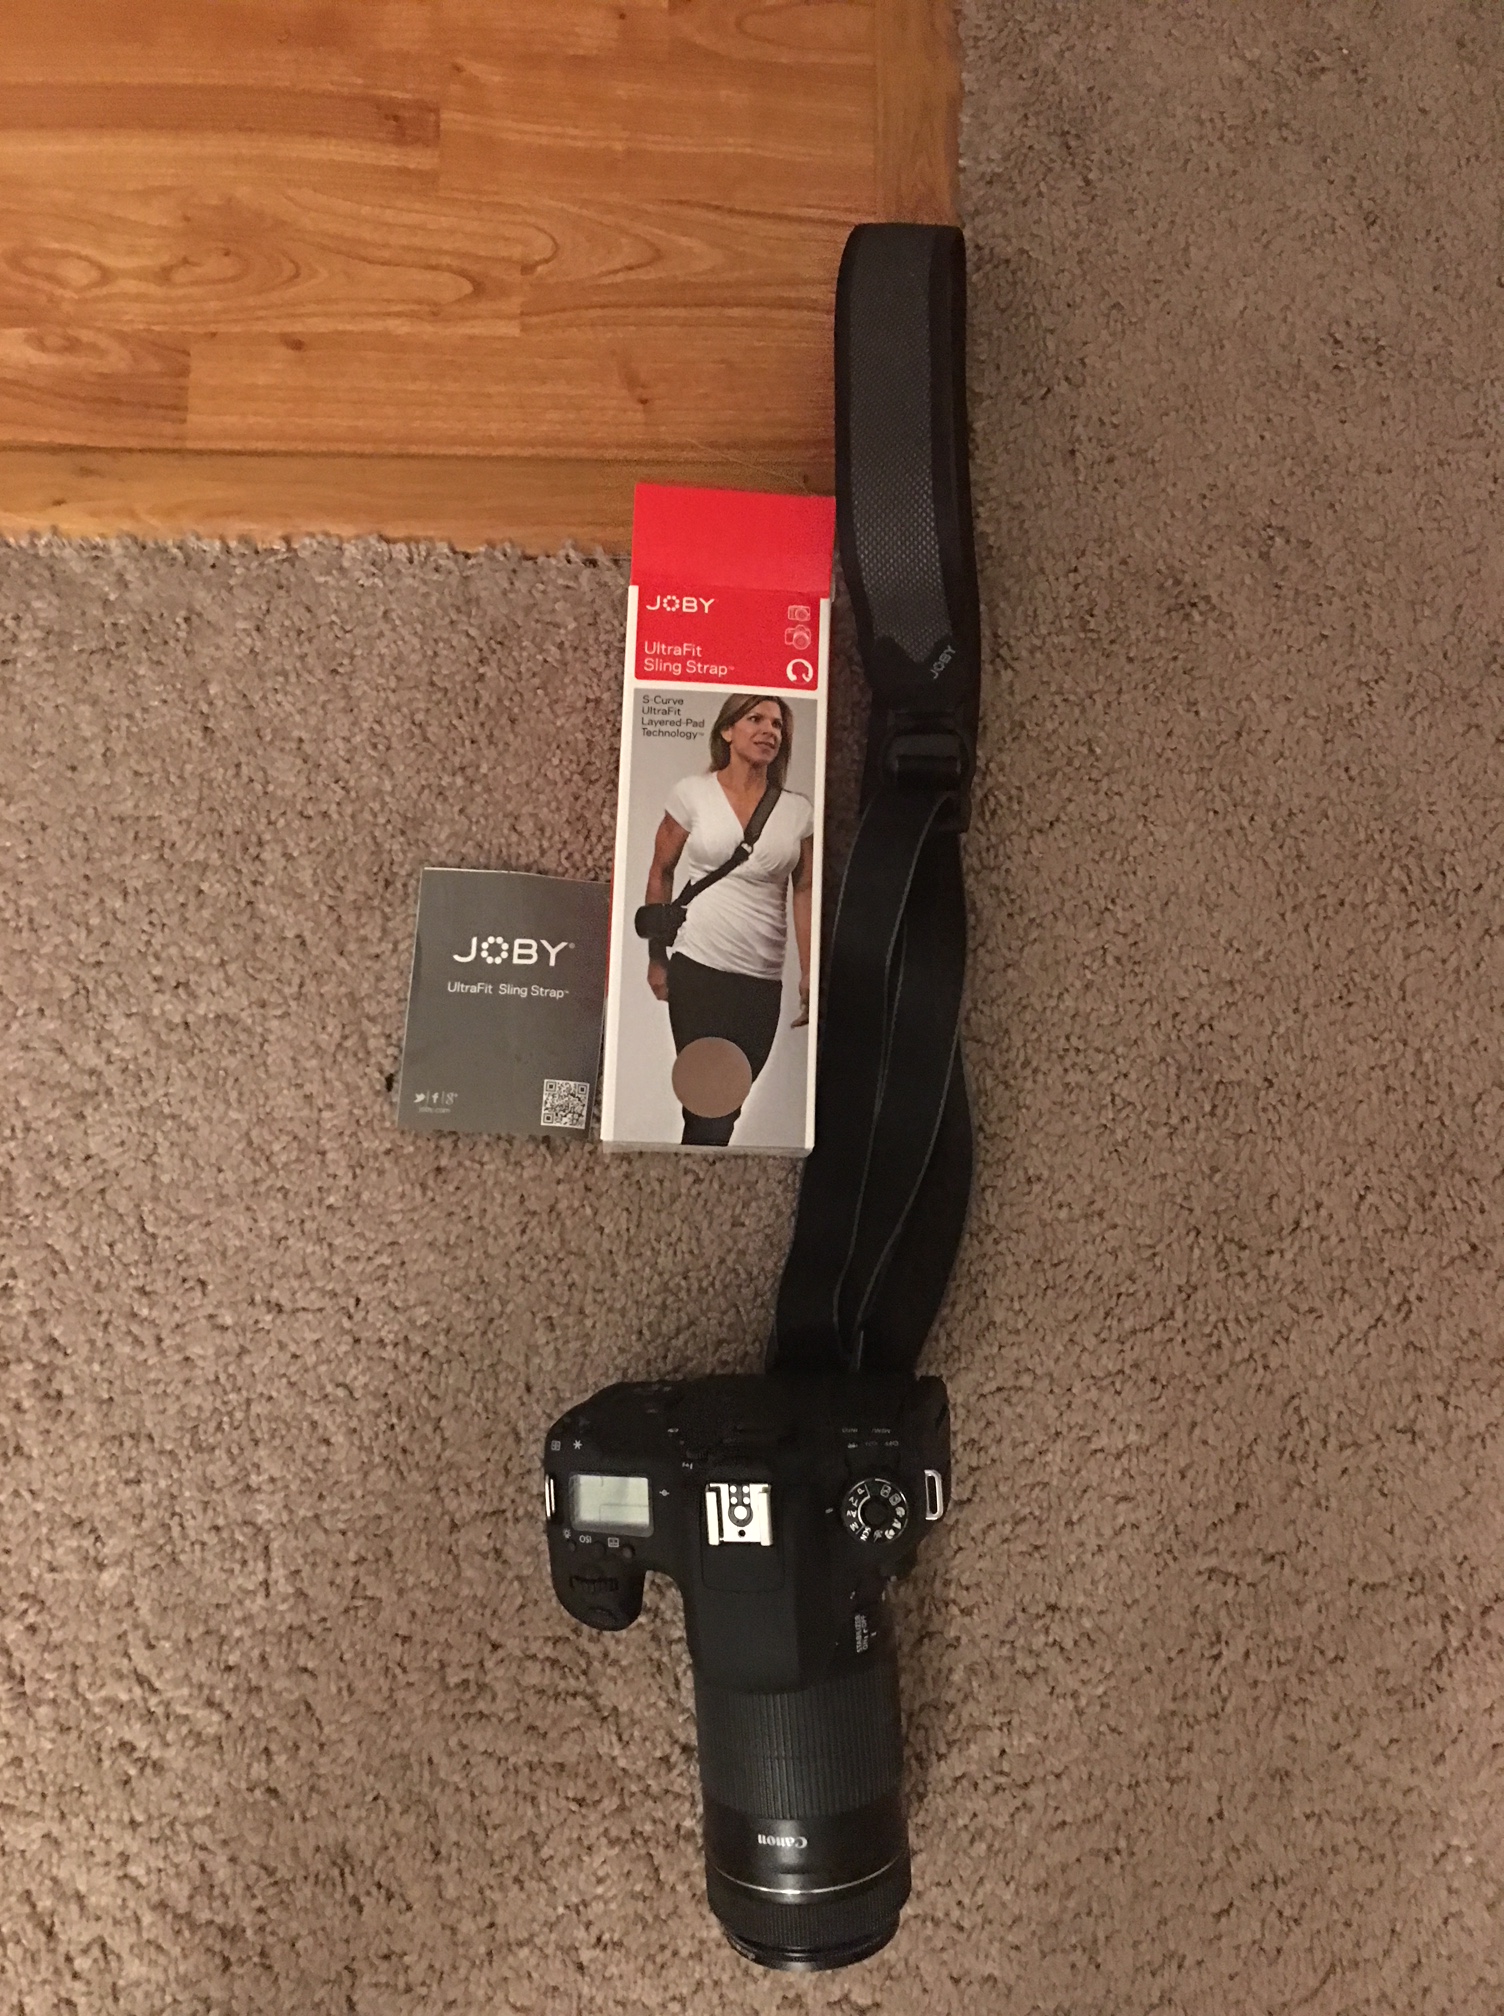
The Joey strap isn’t padded but it isn’t uncomfortable. You grab the O-ring and the camera and pull them in opposite directions to tighten or loosen the camera while wearing it. Very simple, effective design!


{DSLR Sling Guide: Compare 3 Slings}
Before selecting the Joby Sling Strap, I looked into the Black Rapid Curve Strap, Altura Rapid Fire Neck Strap and the new Cotton Carrier Skout. The Skout was immediately disqualified because it wasn’t available at the time, and I needed something immediately. FYI, I still wouldn’t have selected it, even if it had been available.
Black Rapid vs. Altura vs. Joby
Black Rapid is the high end ($80-$100). Altura is low end ($20) and Joby is in the middle ($37-$45). The features that I liked about the Black Rapid strap were:
- The strap is curved, which is more ergonomic.
- The strap has a mesh lining to release heat – making it breathable.
- It comes with the tether redundancy for extra peace-of-mind that the camera is protected from falling. Their tether is more secure compared to the tether on the Altura Rapid Fire. Additionally the Black Rapid sling has a locking mechanism so that when the camera is not in use, you can lock it in place on your side.
The Altura Rapid Fire is basically a low cost copy of the Black Rapid Curve without some of the features:
- Mesh lining for releasing heat
- The curved ergonomic strap
- Extra tether
- No locking mechanism at all
The thick part of the strap itself doubles as a pocket to carry extra memory cards or a microfiber towel. That’s nice, but not a reason to buy that strap. You get what you pay for, and the reason why the Altura is so much less expensive compared to the Black Rapid is because it doesn’t have the most important features that the Black Rapid does such as the locking mechanism to lock the camera on your person. Instead the camera will sway and swivel around and if you bend down, it’s game over for your camera.
(Why I Liked Joby Better Than Black Rapid
and Altura Slings Straps}
I went with the Joby strap. Why? Because the Black Rapid and Altura Rapid Fire both have a big design flaw – the camera can swivel when you’re wearing it. Even though you can lock it in place on the Black Rapid Curve so that when you bend down, the camera won’t fall forward – it still swivels on your back and when you’re walking. And the Altura has no locking mechanism at all.
The Joby has a locking mechanism that keeps the camera secured to your body – no swivel AND stays in place when you bend down. In the photo below, I’m bending down to pick up something from the floor and the camera didn’t move!
So, I really like the locking mechanism on the Joby. The two things that I don’t like about the Joby are that the strap doesn’t have padding. It’s still comfortable, but I wish it had some padding. And it doesn’t come with the tether redundancy. I had to buy that separately (cost $5). But still, overall I spent $32 for the strap + tether and got a functional, comfortable strap that women of all sizes can wear.
There are two different sizes. The strap is adjustable, so you can adjust it to your height. I’m 4’11” and the women’s strap fits! I wear the small it at its shortest length and it’s perfect.
I received the strap today and it literally took only a few minutes to attach it to the tripod connection on the bottom of my camera, and I was ready to go! It’s super comfortable, functions really well and my camera feels firmly secured on it. For extra peace-of-mind, I also bought the Altura tether as a redundancy just in case the Joby connection ever gets loose.
You just thread the tether through one of the eyelets on your camera and attach the lock side to the sling strap. For the $5 or so I spent on the tether it’s worth it.
{Lens Pouches}
I have these lens pouches to carry my lenses in my bag. I love these! They do a great job of keeping my lenses secure and protected; and were under $15! These fit nicely into my daypack and are perfect for when you’re traveling with lenses that aren’t attached to the camera body.
{DSLR Photography Scenarios and What Gear to Carry for Each}
Now that we’ve gone over camera carrying gear, let’s talk about what gear to use in various scenarios. There’s not one right answer on how to carry your camera while hiking, trekking or in transit. It really depends on where you are, the hiking conditions, what other gear/luggage you have with you and your individual comfort. You might need a couple different bags on a single trip. Let’s first address hiking and trekking.
{Where You’re Hiking and The Conditions}
Considerations that will determine how to carry your DSLR while hiking and/or trekking:
- Do you need quick access to the camera, i.e. photographing animals vs. unmoving vistas?
- How strenuous is the hike?
- Weather conditions
When Quick Camera Access Is Not Required. Whenever I’m hiking in an area with great vistas but not necessarily a lot of wildlife, I’ll carry my DSLR in my Ogio backpack because I know I won’t need quick access to my camera. Alternatively, I could carry my DSLR in my Lowepro crossbody bag, the chest harness, or the Joby strap, but I personally find the backpack the most comfortable.
I’m aware that when I carry it in my backpack, I’ll have time to stop, remove the camera from my pack and then shoot photos — but in this scenario I’m ok with that. The Joby strap always remains attached to the camera anyways, so if I change my mind while hiking I can easily wear the camera too.
When I was in Belize recently I didn’t even take the chest harness with me. I only took my crossbody Lowepro bag, as I went to San Ignacio and Caye Caulker which are not areas with a lot of wildlife. We didn’t do any strenuous hikes and it was more of a leisurely walking around sort of trip. If I’d gone to the Cockscomb Jaguar Sanctuary, I would’ve taken the chest harness, crossbody bag and the Joby strap.
So as you can see it really depends on where you’re hiking or trekking, what you’ll be shooting photos of, to determine the gear you’re going to carry.
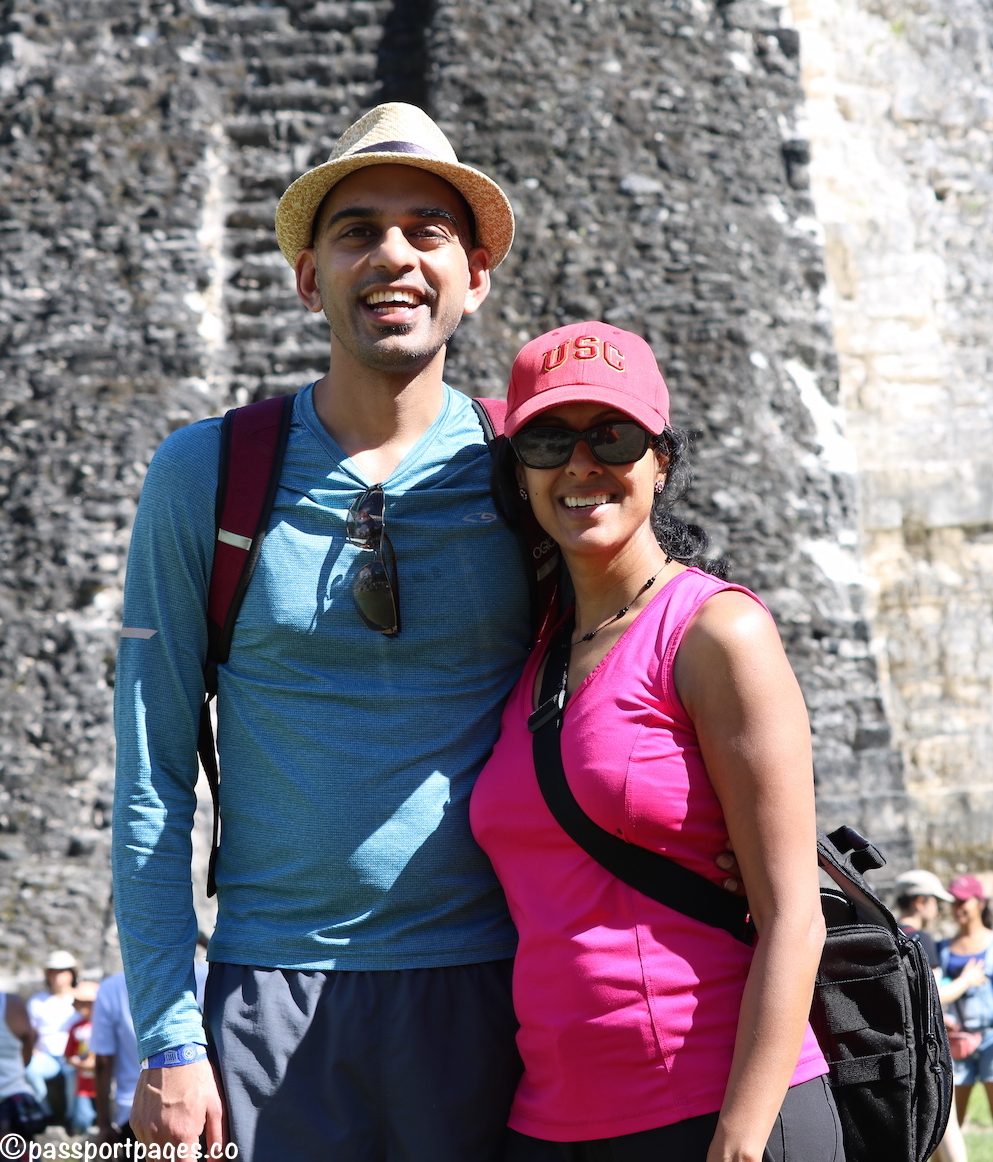
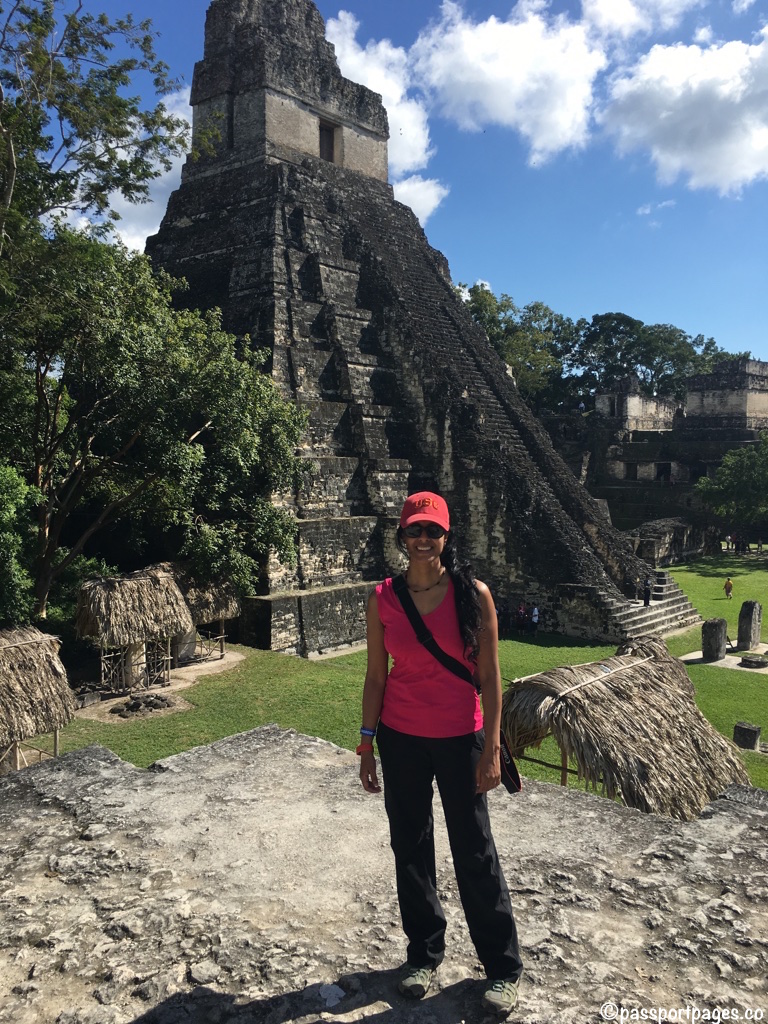
Below is a photo of my husband and I at Tikal, Guatemala. I didn’t take the chest harness because I didn’t need it. The crossbody Lowepro carrier was perfect.
When Quick Camera Access Is required. Whenever I need quick access to my camera, I have it in the Lowepro carrier or just wear the camera via the Joby strap.
On hikes where I need my hands to scoot, or hold onto something, I prefer the Lowepro as well, as the camera is secured inside and chances of it bumping against a boulder or debris are slim.
The Joby strap on the other hand, locks the camera into place on me, but if I’m butt scooting or have to walk through heavy brush like I did in Uganda I found myself holding my camera in one hand in a protective hold vs. being completely hands-free with the chest harness.
When I was in Corcovado in Costa Rica I wore my DSLR in a chest harness. That’s a more serious, rugged hike and I optimized for having really quick access to the camera as the wildlife there is abundant – Spider Monkeys, Cappuccino Monkeys, Howlers would race by. We saw the tracks of a tapir but didn’t get to actually see one. Overall I was really really really glad that I had the chest harness in Costa Rica which was more comfortable than the crossbody. I hadn’t purchased the Joby strap during that trip and now looking back, if I had I probably would’ve replaced the chest harness with the Joby strap because I don’t like how the chest harness looks on me in photos and the Joby strap makes carrying the camera equally comfortable.
In Manuel Antonio it was really hot and overall I think I was able to be out longer because I was comfortable wearing the chest harness. Again looking back I could have replaced the chest harness with the Joby strap or just worn the crossbody without the chest harness.
{What About Carrying Multiple Lenses and Tripods?}
Multiple Lenses. I am a hobbyist photographer. I tend to travel with 1-3 lenses. One lens stays attached to the camera body and the others in pouches in my backpack or in my Lowepro crossbody.
Tripod. I don’t travel with a tripod.
This is where preparing before your trip is really important. Spend time, before you leave, to understand the shooting conditions i.e. will you need a zoom lens? Low light capability? Wide angle?
For my trip to Costa Rica my Canon 55-250mm was perfect. I was shooting on bright and sunny days and zoom was the most important thing I needed. For my trip to Uganda I had to rent a lens because I needed a lens with a wide zoom range as well as good low light capability. For Maui I rented a wide angle zoom lens.
For the most part I have one primary lens and always a second for wide angle or zoom.
{Different DSLR Harnesses}
A quick note here about harnesses. I bought the chest harness that attaches to my Lowepro crossbody. You may have also seen Cotton Carrier’s chest harness system (below) or Peak Designs carrying system. My issue with these carrier systems is that the camera is completely exposed, whereas with mine in my Lowepro I could protect the camera by carrying it inside the padded bag without compromising on quick access.
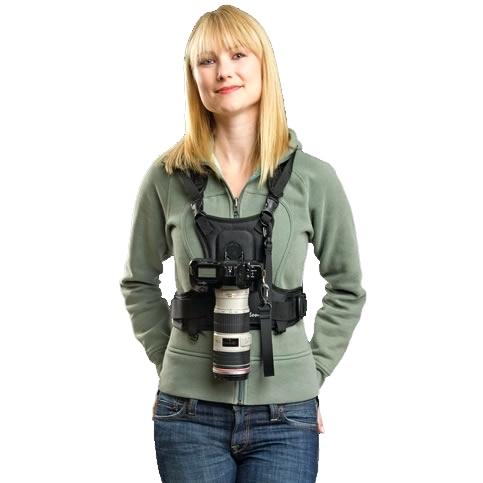

Cotton Carrier also makes a harness that attaches to the strap of your daypack/backpack. Again the camera is exposed and I don’t like that the weight is all on one shoulder, not to mention crushing one of your girls.
{Protecting Your DSLR Camera From the Elements}
You also want your camera to be protected from the elements. Get rain covers. My Lowepro crossbody bag came with one and I bought a generic one from Amazon for my backpack. I also always travel with a few extra large plastic bags and ziploc bags.
I haven’t needed a proper dry bag yet, but I wouldn’t hesitate to get one – plus they’re not expensive. Update: I did buy a dry bag for a recent trip to Hawaii and so glad I did! I was climbing a rock formation to get to the edge to photograph sea turtles and I bit it and fell in the water and my camera was fine.
If it’s raining or snowing a lot I just put my camera away completely – as in just enjoy the experience sans DSLR photos. For me it’s just too risky and not worth potentially ruining my camera (my first DSLR died from rain damage so I’m scarred from that experience). If it’s drizzling I still use the camera but have a plastic cover for it. You can find any number of these on Amazon.
{Function Over Fashion}
For me carrying my camera in my backpack, on my back is the most comfortable. But for some hikes or treks as mentioned above, where you’re going to be coming across wildlife, if your camera is tucked away in your backpack, then you might as well not carry a camera. Having it in the backpack is useless. I think the chest harness is the most comfortable because the weight is not hanging from your neck. Unfortunately, the chest harness is also the most unattractive way to carry your camera.
I know what you’re thinking, isn’t the chest harness awkward for women…anatomy wise? And surprisingly no, it wasn’t.
I found the Joby strap to be the best of both worlds. It doesn’t look dorky and it’s comfortable and functional. As for protecting the camera against the elements, I always keep a cover on me that I can access quickly.
{How I Carry My Camera in Transit}
For each of my trips I either take:
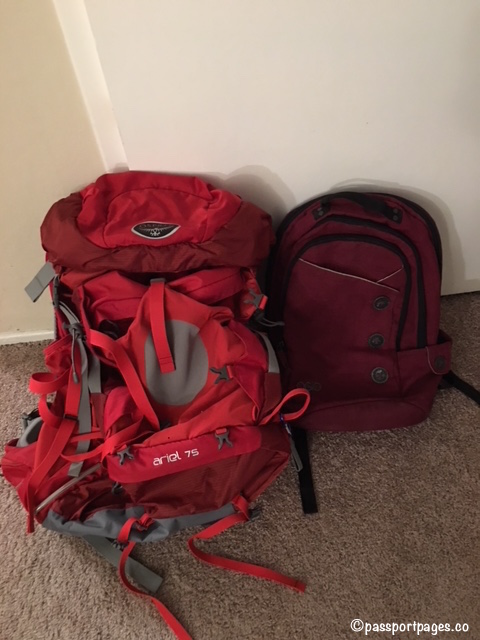
- Osprey pack (check in or carry on in overhead bin) + Ogio daypack (carry on under seat in front of me).
- Roller suitcase (carry on overhead bins) + Ogio daypack (carry on under the seat in front of me).
For traveling on the plane, I usually wrap the camera body (without lens attached) in a heavy scarf and place it inside my Ogio backpack. I keep my lenses in these pouches, also in my backpack. That way I can put the crossbody Lowepro carrier in my checked luggage rather than my daypack, as it would make my daypack very bulky and uncomfortable. And to save space, I fill up the crossbody carrier with socks and panties.
How I decide whether to take my Osprey pack vs. the roller bag depends on how much moving we’ll be doing at the destination and whether or not we’re doing any camping once we get there. In Costa Rica we moved around within the country a lot – every few days for 12 days so I took my Osprey pack. In Belize we only had two destinations at 4-5 nights each so my roller bag was perfect.
{My Costa Rica Itinerary}
- Fly into San Jose International Airport
- Drive to La Fortuna (Arenal) – 3 nights
- Drive to Monteverde – 1 night
- Drive to Uvita – 3 nights
- Drive to Manuel Antanio – 3 nights
- Drive back to San Jose Airport to head home
I did a fair bit of hiking in each location – hanging bridges, cloud forests, rain forest hikes, including pretty rugged hikes in Uvita and Corcovado; and I was REALLY REALLY glad that I had the chest harness. I was so comfortable and got some great photos!
{My Belize Itinerary}
- Fly to Belize City Philip Goldson Airport
- Drive to San Ignacio – 5 nighs
- Fly to San Pedro, Ambergris Caye
- Water taxi to Caye Caulker – 4 nights
- Water taxi back to Belize City
I was glad I didn’t bring my chest harness.
{My Uganda Itinerary}
- Fly into Entebbe and stay for 1 night
- Fly to Murchison Falls – 3 nights
- Fly to Kasese Airstrip + drive 2 hours to Fort Portal – 2 nights
- Fly to Kihihi Airstrip + drive 1.5 hours to Buhoma area of Bwindi Impenetrable National Park
- Fly to Entebbe Airport from Kihihi airstrip
I only took my Joby strap.
{My Uruguay Itinerary}
- Fly into Carrasco International Airport
- Stay in Montevideo 9 nights
- Day trips to Colonia, wandering around Montevideo and maybe Punta del Este depending on weather
I’m taking my roller bag and Ogio backpack + crossbody Lowepro carrier and Joby strap.
{My Toronto Itinerary}
- Fly into Toronto Pearson Airport
- Drive to accommodation in Brampton – stay 5 nights
- Day trips to Niagara Falls, City center (Royal Ontario Museum, Dundas Square), Shopping at Square One Mall, Mississauga
I’m taking my Lowepro Carrier and Joby strap.
{Conclusion}
How to carry your DSLR while hiking and traveling is something worth spending some time to be thoughtful with. It’s a big investment to have a camera, so you want to get a lot of great use out of it and make sure you’re comfortable on the road too.
Each type of bag or carrying system has a use case:
Backpacks: hikes that don’t require quick access to your camera
Chest harness: quick access, long hikes, strenuous hikes
Crossbody: quick access, shorter hikes, less strenuous hikes
Straps: hiking, social events, walking around a city
I don’t go for specialized camera bags because they don’t double well as daypacks and can be quite expensive.
Cover image: hiking around the Iao Valley State Park, Maui, Hawaii, August 2019.
I hope you found this info helpful! If so, please let me know in the comments. I love hearing from our readers, as well as your fun, funny, interesting, and helpful stories from your travel experiences! You might like to follow us on Facebook and Instagram too, where we share a lot of different content and images.
Happy adding stamps to your PassportPages!
Sincerely,

{About PassportPages}
I created the PassportPages travel blog, to provide nuanced, detailed travel advice, tips, and hacks for traveling all over the world — from a unique and different perspective than the other popular travel blogs. There aren’t as many travel blogs geared towards:
- petite women
- vegetarians/vegan travelers
- ethnic Americans, Canadians, and others
Other PassportPages articles you might like:
How to Use Your DSLR in Humid Conditions

4 thoughts on “How to Carry Your DSLR While Hiking, Trekking, and Traveling: For Women”